Transforming a 6 Cube Storage into a Mid-Century Media Console
Hello Everyone...
I'm here today with an Ikea Hack.
I know everybody loves a good hack.
Now Let's Begin..
I will first show you the finished project and close up details on of the console.
Next, it will be the steps on making the doors.

Closer look at my finished product..
Doors not perfect but great for a first time door maker..

The hinge was purchased at Home Depot.

Screwed hinge in but left one screw out due to door closing awkwardly and door splitting a little.
I don't have a problem with this we won't use the doors a lot. As long as front looks good, I'm good. In the future, I'll be making something a little better..
Always pre-drill your holes in both door and cube to prevent wood splitting.

Door was also a little flimsy, to reinforce it. I added dowels in form of a diamond.

And We're Off!!!!
About 4-5 years ago, I purchased this Better Home & Garden 6 cubed for storage in my kitchen.
Needless to say that didn't work out, so I put it in my office until I could find something to do with it.
This was purely luck on my part, I was in the process of redecorating my living room and I wanted a more natural look. I decided to take the cube out of my office and use it as a TV console because of it's color. I place it in the living room and didn't touch since 2018.
I grew increasingly aggravated because I didn't have storage and didn't want every cube opened.
My mind frame was to used old trim I had from a previous project and "try" to make a door.
And I Most Certainly Did...
Click on the link below straight cube..

It's the exact cube but my color was called Weather Oak..

Tools needed:
Miter box and saw
Trim to make door
Measuring tape
Electric/Brad Stapler gun
Brad nails
Stain of your color
Sand paper
Caning or Wicker
(Whatever materials to put inside of framed door)
Drill bits
Screw driver or Drill
Handles
Hinges
Legs
First, Measure your cube on how large or small you want your doors to be.
My doors were 15 1/2" wide by 31" height.
Measure 12 times before you cut your wood
The trim was about $1.49ft. I purchased about 3ft.

Put wood on miter box where the mark is

Holding wood steady, cut wood exactly on the marked line 45 degrees.

You can actually see the mark and the angle on how it's cut.
Make sure the wood is in the upright position

I cut 4- 15 1/2" and 4- 31" because I'm making 2 doors.
As you can see, this forms a perfect panel..

Taking a brad stapler at each corner of wood, staple until all corner are connected..

After making panel, I placed it in front of cube to see if I'd did a good job.

Yes I did!!!

Time to stain, I found stain on clearance aisle in Wally World.

Great find..

Before staining, you need to use sand paper to sand the front side of the door.
Wipe clean, you really want the stain to get into the wood.
Paint with paint brush and leave on for about 15 mins, it's really according to you and light or deep you want your stain.
It came out wonderfully..

Closer look

Even closer look..

I purchased the wicker caning from Amazon
Link below

Measure caning the size of the door and glue the caning down, tightening as you glue down.
I glued all middles first then pull tight all around.
After I added gold pulls and place it against cube, waiting patiently until my legs are delivered.


They actually came earlier than expected..
So, I'm soo happy...

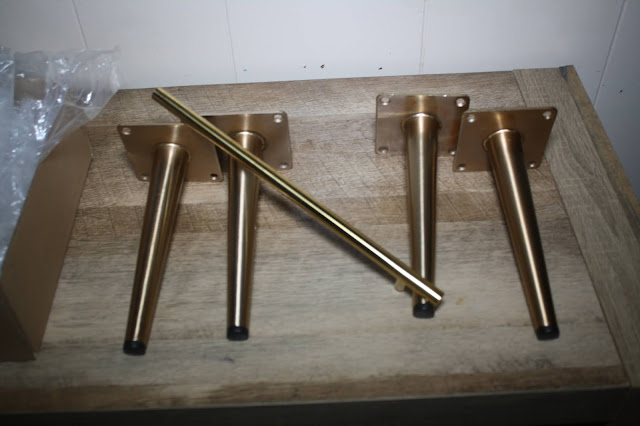
Console with legs attached

Closer view with both panels on.

It came out soo well..
It's giving a Mid-Century Modern vibes to me.
I wanted a modern natural piece.
But I love everything about her..

She looks perfect with the entire living.
Also, a lot of the vases are spray paints and/or DIY, then spray painted. I made the agate stone picture, inspired by Restoration Hardware. The basket was a Ross find. Plant stand was DIYed (first pic).Now I'm just want for IKEA to have another glass shelf to flank the other side of the console.
All of this has changed.
Went to Good Will and hit the jackpot..
LOL!!

Living Room

If you have any questions please feel free to comment, share and subscribe to me blog..
I will be posting a lot more of my Home DIY's, DIY's, Home Improvement and Room Makeovers..
Thank u in advance for subscribing.
Until Next Time...
HACK IT CHIC'!!!

This comment has been removed by a blog administrator.
ReplyDeleteThis comment has been removed by a blog administrator.
ReplyDeleteThis comment has been removed by a blog administrator.
ReplyDelete